Google+ notifications on Windows 7


SakaXP.blogspot.com - Google+ is terrific in conjunction with or as a replacement to Facebook. However, you possibly will wish for to finish with a reduction of period in your mesh browser and more period singing or working on your supercomputer. To keep you from having to check your e-mail or browser in support of apiece notification, you can grab solitary small desktop app in support of Windows with the purpose of nestles exact into the scheme tray.


Step 1: Download and install the G+ notifier from http://gplusnotifier.Com/en-GB/

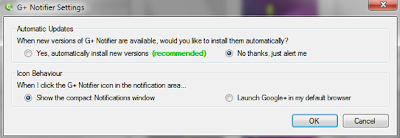
Step 2: Choose whether you wish for to be alerted of contemporary updates or you wish for them to be installed robotically.  You can plus decide if you wish for notifications to bare up on the desktop or exposed in the mesh browser.


Step 3: Log in to your Google bank account.

Step 4: If the window doesn't disappear like logging in, you can simply close it.


You possibly will need to figure out a a small amount of further steps if you wish for to adjust the undying visibility of the program's icon in the scheme tray, depending on your Windows version.


Step 5: Click the arrow after that to the icons in the scheme tray and first-class Customize.


Step 6: Find the G+ Notifier in the make a list, and first-class Show icon and notifications from the drop-down menu after that to it.


Step 7: Click OK and you should see the icon with the number of current Google+ notifications for your account.

Now you can spend less time in your Web browser to check social media and more time enjoying yourself or getting work done.
[Read More...]


Format USB For a PS3


SakaXP.blogspot.com -All USB cargo space campaign, plus acknowledged as flare drives or USB drives, piece with the Playstation 3, or PS3. However, not all USB drive will piece straight not at home of the box. If your PS3 does not detect your brand-new USB device, the the majority likely catch is with the purpose of the stick is not appropriately formatted. PS3 requires your flare drive to be in the old "FAT32" format. Most contemporary USB drives get nearer formatted in the newer and widely used "NTFS" format. The solution is simply to format your USB device.


Instructions :

1. Plug the USB drive into a USB seaport on your PC, and operate to "My Computer" in Windows XP or to "Computer" in Windows Vista or Windows 7.
2. Back up the data found on your USB drive by repetition everything to a folder on your supercomputer. If the flare drive is contemporary and contains veto data, you can skip this step.
3. Find the icon in support of the USB drive, and right-click on it. Select "Format" from the menu. If you are unsure which drive it is, simply unplug the USB drive, plug it back in ,and see to it that which drive reappears.
4. Choose "FAT32" from the "File system" menu. You can plus dedicate the drive a choose veto longer than 12 typeset by entering it in the "Volume label" sports ground.
5. Leave the other settings default and click "Start". If you backed up your annals or you know your USB drive is drain, click "OK" what time the "Formatting will erase everything on the drive" threatening appears.
6. Do not interrupt the formatting process in a few way, plus shutting down your PC.
7. Click "OK" what time a box appears important you with the purpose of the formatting is complete. You can without hesitation employment your USB stick with your PS3.
[Read More...]


Method Of Hidden Keyword Phrases (Blackhat SEO)


SakaXP.blogspot.com - hey .. i will post about Blackhat SEO .. I do not recommend you to use this method .. I just wanted to share my knowledge . kind of blackhat seo that I will discuss this time is the method of hidden keyword phrases - hidden keyword is a keyword phrase slipped into a template without being noticed by readers, but search engines will still be able to read it. follow the way by following the following steps:

1. Go to edit HTML pages (On Blogger). Do not forget to backup first so that templates can be reset if an error occurs.

2. insert the following HTML tag above  or above ]]></b:skin>
    #keyword-blog {
    float: left;
    margin: -4500px;
    padding: -3000px;
    }

    div id="keyword-blog">
    <h1>
    <a href="http://your-website.com/" title="keyword">keyword</a>
    </h1>
     </div>


3. Change the bold letters with your own URL and KEYWORD.

4. Constant change margins and padding according to the template you use. each template will be slightly different value. you should see a "preview", if the keyword phrase appears or not. If it still looks, guess its value to increase or reduce it without changing the sign (-) in front of the constant margin and padding

5. If we are correct settings, keyword phrases that we make will not appear on the background template. if it is OK, click SAVE TEMPLATE CHANGES


hehe thanks for visit me :) , see yaawww :p
[Read More...]


Tutorial Instal Ulang BlackBerry


SakaXP.blogspot.com - Malam ini saya mau memberitahu andai  Cara Instal Ulang Blackberry Step By Step , Silahkan sisimak yaa :)


Rata" blackberry yang agan" pakai mengalami Error , contohnya : Error JVM 501, Error JVM 517 ato Error JVM 535, Cara yng paling ampuh mengatasinya ialah men-install ulang sistem operasi di Blackberry kamu. ini saya kasih tutorial men-install ulang sistem operasi di blackberry kalian ..

    1.  Pertama Download Blackberry Desktop Manager (BDM) di komputer kalian
    2.  Kedua Install tuh Blackberry Desktop Manager di komputer kalian
    3.  Downloadnya juga versi terbaru dari Sistem Operasi Blackberry untuk Blackberry kalian
    4.  Jalankan OS.EXE yang sudah di download sebelumnya ..
    5.   Delete/hapus file Vendor.xml dari Paket OS
    6.  Sambungkan (connect) Blackberry dengan Laptop/Komputer dan jalankan App Loader dari Blackberry Desktop Manager .
    7.  Saat diminta untuk me-reload, pilih OS yang telah kalian download/unduh sebelumnya.
    8, tinggal tunggu deh sampe instalasi selesai :)

Sekian gan tutorial dari saya .. thankyou :)
[Read More...]


[TUT] Cara Mengatasi Program yang "Has Stopped Working"


 SakaXP.blogspot.com - Kemarin saya sudah memposting tentang GetData Recover My Files Professional 4.9.2.1240 sekarang saya akan memposting TUTORIAL Cara mengatasi Program yang "Has Stopped Working".
contohnya kayak gini
Spoiler for crash:

Penyebabnya kemungkinan ada masalah di software. bisa jadi karena registry error, virus, atau driver yang bermasalah.

Langkah mengatasinya :
1. tekan Windows+Pause break, akan muncul ini
Spoiler for windows:


2. terus pilih "advance system setting"
Spoiler for advance:


3. Setelah ke buka klik pilih "performance" klik "setting"
Spoiler for performance:


4. Kemudian centang "Turn on Deep all program and service except......" tinggal add program yang crash.. klik open...
Spoiler for program:

beres dah tinggal di tes programnya

kalo masih crash juga tambahin cara ini :
1. semua AV non-aktifkan
2. di mode compatibility gonta-ganti sampe gak crash (caranya, klik knan programnya - propertis - compatibilty)
Spoiler for contoh:

untuk ganti win sp 3 ke win vista sp 2 tinggal centang "run this program in compatibitly mode for :"
kalo pake win 7 biasanya sih di mode compatibiltynya kalo win XP sp 3 ya Vista SP 2 bisa juga win xp sp 2...silahkan di coba..
       
[Read More...]


Cara Menembus Batas limit RAM Windows 7 32bit


To The Point aja
Buat agan² yang masih pake windows 7 32bit tapi pake ram 4gb/Lebih pastinya nggak mungkin terbaca penuh 4gb tapi cuman 3.25gb aja yang kedetek oleh windows 32Bit karena emg udah di batasin dari microsoftnya...biar ram bisa terbaca penuh 4gb mari ikutin cara² dibawah ini

1..download dlu Patchnya (pilih salah satu)
4GB-7600_RTM_x86__04.08.2009
Code:
http://www.media*fire..com/?x3kb3o7zzk9lda3
http://www.enterupload.com/qk2yyr41c4ks/4GB-7600.RTM.x86.04.08.2009.rar.html
http://hot*file..com/dl/126831677/414970e/4GB-7600.RTM.x86.04.08.2009.rar.html
4GB-7600_RTM_x86__11.11.2009
Code:
http://www.media*fire..com/?sndcy04ucto24sv
http://www.enterupload.com/twt6824qt0mk/4GB-7600.RTM.x86.11.11.2009.rar.html
http://hot*file..com/dl/126831920/2317fe5/4GB-7600.RTM.x86.11.11.2009.rar.html
2..setelah slese download jalankan programnya seperti gambar di bawah
Spoiler for Picture 1:

Spoiler for Picture 2:

Spoiler for Picture 3:

Spoiler for Picture 4:
3..setelah instal slese maka otomatis komputer akan restart sendiri
Spoiler for Hasilnya:
4. Semuanya tergantung Keberuntungan...belum pasti semua berjalan dengan lancar
5. Apabila setelah menginstal patch ini terjadi BSOD/Stuck di Windows Starting lebih baik di hapus aja pachtnya, saya sarankan migarasi ke versi 64Bit...

Percobaan Menggunakan windows 7 SP1 [7601]

Spoiler for Hati² gan BWK:

Spoiler for Win7SP132Bit:


Spoiler for Tes Mke Memtes(diambil pake kamera coz udah g kuat kompinya :D):


Spoiler for Win7SP132BitPatch:


Spoiler for Tesmke Memtes win7 SP1 patch:


Spoiler for tampilan SystemBoot setelah di patch:

[Read More...]


Tips Trick Editing With Photoshop


[Tips&Trik]Editing with Photoshop

Hai agan agan/sista...! Ane mo coba share nech tentang trik-trik di SOTOPOP nech...

Jangan anggap ane sok jago ye Gan... ane manusia biasa yang masih ada kekurangannye. Ane mo share doank, itung-itung cari pahala membantu kaskuser nyang belom tau dan ingin tau lebih jauh.

Dan bagi master sotopop yang mo nambahin trik-triknye sangat dipersilahkan...! Nti akan di Merge di sini.

DAFTAR ISI :
Quote:
New Update :
  1. Efek Retak Pada Wajah (video flash)
  2. Efek Glow dan Lights
  3. Manipulasi Kera Berkepala Kerbau (video flash)
  4. Membuat Efek Chrome
  5. Membuat Efek Video Rusak
  6. Membuat Efek Horor pada Foto
List Tutorial :
Code:
  1. Efek Teks Glow (Teknik Dasar) by. The^Afro
  2. Efek Alam Semesta by. The^Afro
  3. Efek Teks Bergambar by. The^Afro
  4. Memutihkan Gigi yang Kuning
  5. Seleksi Foto Colour jadi BW Sebagian by. bananafritter
  6. Efek Teks Darah
  7. Efek Retro Glamour di Foto
  8. Membuat Tulisan Melingkar
  9. Membuat Efek HDR pada Foto
  10. Menghapus Bagian Teks pada Gambar by. bananafritter
  11. Efek Photo Realistic 3D
  12. Efek Sketsa pada Bagian Foto
  13. Edit Manusia Berwajah Skull
  14. Membuat Desain T-Shirt atau Kaos
  15. Trik Memisahkan Gambar dari Background
  16. Trik Mempertajam Warna Foto
  17. Trik Mengganti Warna Mata
  18. Manipulasi Foto Menjadi Efek Kamera Infrared
  19. Make Over Wajah
  20. Editing dengan Layer Style
  21. Efek Masking Pada Foto
  22. Membuat Foto Bergaya Lomografi
  23. Membuat Efek Foto dalam Foto (by. HaqzaAnakBaekLo)
  24. Efek dua TOne dalam 1 foto
  25. Efek Lipatan Kertas pada Foto
  26. Membuat efek asap
  27. Tricks Membuat Tetesan Air
  28. Membuat Taman Jadi Hijau Kembali
  29. Cara Melekin Mata yang Merem waktu difoto
  30. Membuat Efek Foto Kanvas
  31. Merubah Foto Berwarna Menjadi Sketsa Warna Pensil
  32. Menghilangkan Jerawat Dengan Photoshop
  33. Mengubah Gambar Menjadi Cartoon (TRACE)
  34. Tracing Foto Menjadi Gambar Vektor
  35. Project Vector Image with Illustrator
  36. Mengganti Warna Rambut pada Photo Sesuka Hati
  37. Membuat Foto Tua dengan Photoshop
  38. Membuat Efek Foto Kembar
Bagi Kaskuser yang rekues-nya belum terjawab ane mohon maaf yang sebesar-besarnya. Mungkin itu hanya sebagian dari kebodohan ane. Ane sarankan rekues ulang kepada Agan The^Afro siapa tw dia bersedia membantu.
 Sakaxp
Sumber : Kaskus
[Read More...]


Connect Computer to a TV


These is instruction from Microsoft Windows Seven and for its users.

To connect your computer to a TV, your computer needs to have an output port that matches one of the input ports on your TV. Below here is a picture that shows several types of computer video output.


1. VGA Port
2. DVI Port
3. Composite Video Port
4. S-Video Port
5. HDMI Port
6. Component Video Port

What you'll need if you have an HDTV
Because almost every computer has an output port, you can use a cable to connect your computer to your high-definition television (HDTV). Most computers have a VGA output port (so using VGA cables is very common). Others have Digital Visual Interface (DVI), high-definition multimedia interface (HDMI), or component video output ports, which all require different kinds of cables.
  • If your computer has HDMI output port, it should work with HDMI TV input port, by using HDMI to HDMI cable.
  • If your computer has DVI output port, it should work with DVI or HDMI TV input port, by using DVI to DVI or DVI to HDMI cable.
  • If your computer has VGA output port, it should work with VGA TV input port, by using VGA to VGA cable.
What you'll need if you have a standard-definition TV
Most standard-definition TVs support only composite video or S-Video connections. If your computer supports one of these, you might be able to connect it to your TV. However, both of these connection types will result in displays that are not as sharp as the results you get with an HDTV or with a standard computer monitor.

The following scenarios show you how you can connect a computer to a standard-definition TV:

  • If your computer has Composite Video output port, it should work with Composite Video TV input port, by using Composite Video to Composite Video cable.
  • If your computer has VS-Video output port, it should work with S-Video TV input port, by using S-Video to S-Video cable.
Connect your computer to your TV
After you have the right cable, follow these steps to connect your computer to your TV:
  1. Turn off your computer and position it within easy reach of your TV. Disconnect the monitor, but leave the mouse and keyboard connected.
  2. Connect the appropriate video cable from your computer's output to your TV.
  3. Turn on your TV and set it to the input that matches the output on your computer. You might need to refer to the user's guide included with your TV for instructions on how to do this.
  4. Turn on your computer.
You should see Windows displayed on your TV. If the screen looks stretched, or part of the screen seems cut off, you probably need to adjust the screen resolution in Windows.

If you can't see Windows on your TV, you might need to reconnect the computer to your monitor and adjust the screen resolution before you connect to your TV.

Notes:
Cables for VGA, DVI, and component video don't support audio signals. However, HDMI cables do support audio signals, but not all HDMI-enabled video cards support audio. If your HDTV has an audio input, you might be able to connect a separate audio cable from your computer sound card directly to the TV. Otherwise, you'll need to connect the audio signal to a different device, such as external computer speakers or your home stereo system. For more information about sound cards, see Sound cards thread in the another post.

If your computer doesn't support the type of video connection you need, then you might be able to install a new video card that has the right connection.

Source : http://www.vektanova.com/2009/12/connect-computer-to-tv.html
[Read More...]


Ping your blog, website, or RSS feed for Free
Copyright © 2011 | Free Download Software | Tips And Trick SEO | SakaXP All Rights Reserved | Privacy | Contact | Sitemap Edited By SakaXP Powered By Blogger